By: Gren
First Steps
Before we jump in and start playing with the Worldbuilder toolset, we need to check and perhaps adjust a few standard settings, which will help with tuning the Worldbuilder to your PC.
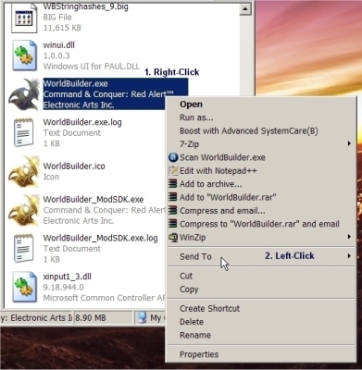
Assuming you have downloaded the program and have already run the installation, the very first thing I did was to locate the Worldbuilder Installation by using Windows Explorer and navigating to C:\Program Files\Electronic Arts\Red Alert 3\Data. In this folder you will find the Executable for Worldbuilder labeled WorldBuilder.exe.
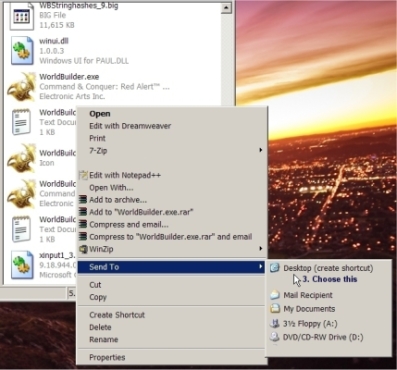
Right-click on the executable and choose the "Send To" option, then select the "Desktop (create shortcut)" option. This will place an icon on your desktop for easier access to the program for future sessions.
The above example is for an installation on Windows XP. For Vista users the path to the Worldbuilder installation should be the same.
When Worldbuilder is started, we are presented with the End User License Agreement (EULA), which appears every time Worldbuilder is used. Click on I Accept to start the program.
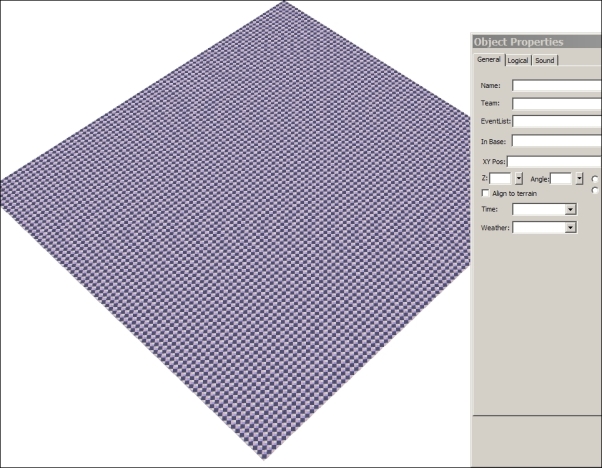
After loading up, Worldbuilder presents you with a Mapping area window, zoomed in, together with a floating Objects Properties palette. The palette allows change to the settings of Worldbuilder tools and can be maneuvered to other parts of the work area by left-clicking and dragging the Title bar. Only either the Mapping area OR the Objects Properties palette can be active at one time. Left-Clicking on either of them will make them active.
View of the Object Properties Palette

The Mapping area window, as you can see above, is primarily presented as a zoomed-in symmetrical grid of blue, white and pink shaded squares, which are sub-divided with graph-type grid-lines. This can be used for accurate measuring and placement of items on the map during the early stages of your design. Some mapmakers prefer to flood-fill the map and use other methods of measurement, particularly if the map is not symmetrical.
To Zoom out the Map area, click on the window to make it active and use the mouse wheel, rotating backwards. When you think you have zoomed out far enough, you can re-position the Map area with the following actions:
To move the map Left, Right, Up or Down, right-click and hold anywhere on the map area and move the mouse in the desired direction.
To rotate the Map area, hold down the mouse-wheel and move the mouse from side to side. Upwards or downwards mouse movements will also rotate the map area, but side-to-side movements will completely rotate the map, and you will soon pick up a feel for maneuvering this way.
View of Zoomed-out Map area and Object Properties Palette
Top
WorldBuilder Options and Toolbar
At the top of the Worldbuilder window and underneath the window title bar are the program options and a standard set of tool icons:

Most of the tool icons are fairly standard and a full description of them is listed in the documentation, which is supplied with Worldbuilder. Here is a quick explanation of the tool icons we will be using as we go through creating our first map:
 |
New (Create new Map) [CTRL+N] |
|
 |
Open Saved or Existing Map [CTRL+O] |
 |
Save Current Map [CTRL+S] |
|
 |
Cut Selected Item [CTRL+X] |
 |
Ruler Tool |
|
 |
Select and Move Tool |
 |
Height Brush [H] |
|
 |
Mound Tool [SHIFT+H] |
 |
Dig Tool [CTRL+H] |
|
 |
Smooth Height Tool [S] |
 |
Lake/Ocean Tool |
|
 |
Texture Single Tile |
 |
Texture Large Tile |
|
 |
Eyedropper |
 |
Flood Fill [F] |
|
 |
Auto Edge Out Blend Tool [SHIFT+E] |
 |
Auto Edge In Blend Tool [Alt+E] |
|
 |
Blend Single Edge [E] |
 |
Terrain Copy Tool |
|
 |
Place Object Tool [P] |
 |
Draw Road Tool [R] |
|
 |
Ramp Tool |
 |
Waypoint Tool [W] |
|
 |
Border Tool |
One important task that we must do before we begin to use Worldbuilder is to check that everything we place on our map is going to be visible. To do this, click on the View option, which is above the Toolbar near the top of the window. A long option list will drop down.
Ensure the following items are checked:
| Show Terrain |
|
Show Object Icons |
|
Show Waypoints |
| Show Trigger Areas |
Show Shadows |
Use Shadow Map Shadows |
| Show Labels |
Show Objects |
Show Roads |
| Show Sound Flags |
Show Map Boundaries |
Show Clouds |
| Show Water |
Show Macrotexture |
Show Reflections |
| Show Fog |
Show Brush Feedback |
Toolbar |
| Status Bar |
|
|
Some of these items are preferable, of course. Depending on your own mapping style and the ability of your system, so this list may be tailored to suit.
Top
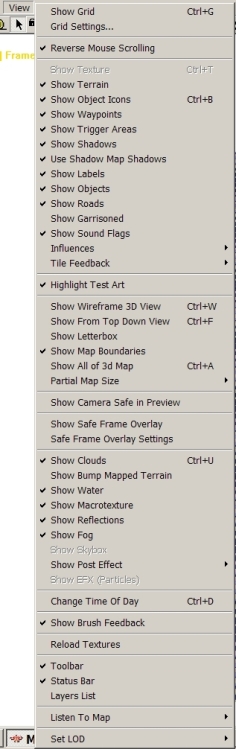 The View Options Selection Menu
Most of the options will be set on starting Worldbuilder for the first time, but it is a good Idea just to check that what you want to display in the map whilst you are working, is flagged to do so.
One other important thing to consider in this options list is the Set LOD option, which is located right at the very bottom of the list.
This setting is for the Graphical Display level (Level Of Detail) you will be working with whilst creating your map.
Hovering over the option with the mouse pointer will open up a sub-menu, with the choices:
Ultra High
High
Medium
Low
Very Low
Because of the high demands on your system that Worldbuilder has, switching between these levels may initially cause your map area to turn completely black. Do not panic! It happens to most mappers sometimes, however high spec the system is. The simple solution is to re-size the Worldbuilder window using the middle of the 3 options in the top RH corner, then back again.

Most of my basic map work is done using the Low LOD setting, then when I need to be more exact, I switch over to High or Ultra High setting, depending on the task in hand.
One last word on Worldbuilder tools is about the Water tools. There are 3 tools currently available which will allow you to place water into your map:
 Lake/Ocean River Waves.
Only water placed in your map using the Lake/Ocean tool will actually appear in-game properly. So at the current time, I tend to use that tool for all of my waterways and features.
Top
» Next ~ Making A Small 1 v 1 Skirmish Map