 Author: Jaymioz
Pages: 1 | 2 | 3 | 4 | 5 | 6 | 7
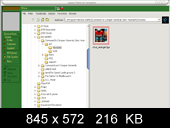
Now open RenX and go to MAXScript -> Import W3D and locate the AIRNGR_SKN.W3D file which should be in:
C:\Program Files\EA Games\Command & Conquer Generals Zero Hour\Art\W3D\
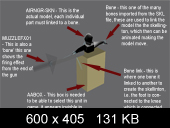
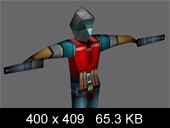
When you select the file, Coolfile's W3D Importer will automatically import the bones (AIRNGR_SKL.W3D) that are represented as diamond wire frame shapes.
The model itself may appear very dark. To fix this, right-click the main model "AIRNGR-SKN" and highlight "Convert To:" then select "Convert to Editable Poly". Then right-click the model again and select "Hide Unselected." Just the model should be in view.
Now press the M key on your keyboard to open the Material Editor.
If you can’t see it press M to open the material editor, and select it from there.
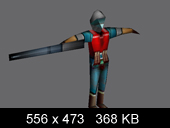
Click & drag the Ranger skin to the model in view; the skin will now be applied.
Now we’ll actually get on editing the model of the ranger. At first this can be a complicated process, so I'll try to make it as easy to understand as possible.
Easy Guide to Editing The Ranger Model
First make sure the model is in Editable Poly mode. Now click the 'Modify' tab on the right of the screen. Click the + sign to make the drop out under Editable Poly appear in the modify display box.
You should see: Vertex, Edge, Border, Polygon, and Element. You need to select 'Vertex,' or alternatively you could just click on the icon representing 3 dots in the selection rollout under the modify display box.
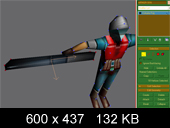
Now highlight all the vertices of the gun. On the right of the screen is a side panel. Click and drag it up about halfway.
Then locate the miniature box labelled "Weld." It contains 2 buttons: "Selected" and "Target." Press the "Selected" button. When you do, the gun may appear a bit darker: don't worry. Now click on "Element" (in the modify display box) and select the gun. If it isn't highlighted then press F2 and it should appear red.
Now scale it down just a little, and click on "Vertex" again. Just select the vertices and the end of the gun and then move them to make the gun smaller. Do this on both ends. Then click on "Element" once again and select the gun.
Next, click on the Modify list and go to Mirror, set the axis to Y in the parameters roll out, and set it to copy. Now adjust the offset to where you think it looks best.
Right click the model and go to Convert to Editable Poly.
Well done! Now your model should have two pistols!
Now we'll actually get onto editing the bones/skeleton to make it fit the model. Right-click the scene and select "Unhide All" and then continue on to the next page.