Areas and Pathways for Skirmish MapsGenerals or Zero Hour
As one of the map reviewers for Generals and Zero Hour map submissions, I find myself repeating this explanation of how areas and pathways should be added to maps designed for Skirmish Games. All too often, I hear complaints that the AI player is weak or something to this effect. Many times it is simply because the map doesn't have any of these items placed or not placed or labeled correctly. Hopefully this outline will help authors create better maps and improve the quality of maps submitted to our site. For a complete listing of items we look at when reviewing maps, please also check out our
Reviewer Guidelines section.
The default skirmish scripts, which load into the map when you start the game tell the AI how to play the game. These scripts call upon areas and waypoint paths you've place on the map and thus
the names of these items and how they are placed and labeled are important or the AI won't function properly.
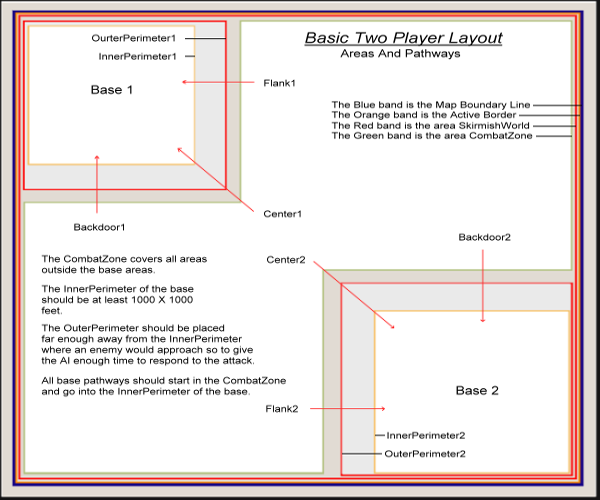
InnerPerimeter The AI should have around 1000 by 1000 feet to build their base. This buildable section of a base has an area that is referenced to in the scripts as "InnerPerimeterX" where "X" is the base number. Each base should have this area placed using the Polygon Tool. The first four bases can be labeled on the Area Trigger Options window by selecting the name from the dropdown window. For bases five through eight type the name in manually.
OuterPerimeter Bases also have another area, which warns the AI when an enemy is approaching. This area is called the "OuterPerimeterX". These areas should be placed as a box around a box with the OuterPerimeter going around the InnerPerimeter with no areas overlapping. The spacing of these areas can be tight in the back or in the corner of the map and then widen where an enemy might approach the base.
*By stating that the AI needs 1000 by 1000 feet to build their base or saying "it should be a box around a box", by no means infers that the shape of these base areas should be square. Instead, these areas should maximize the space you've created for the base.
CombatZone The map should have one area called "CombatZone" that covers an area between the base areas where battles will take place. Some teams built by the AI are told to guard this area but more important is that it is within this area that the AI looks for pathways leading into all bases on the map. Place this area close to the Outer Perimeter areas, again making sure these areas don't overlap and cover all passable areas of the map. As you won't find this name in the dropdown, you will need to type in the name like this, CombatZone.
*No areas should go outside the map boundary line.
PathwaysEach base should have reference to three pathway labels or names, these being
CenterX,
FlankX and
BackdoorX. (X = Base Number) You might have noticed when laying down Waypoints that a window comes up called Waypoint Options. At the bottom on this window is a section called Waypoint Path Labels. This is where you "Label" your pathway. Notice there are three textboxes available for each path, so one pathway could be labeled with all three pathway-names if you chose to.
All pathways should start in the
CombatZone and
end inside the Inner Perimeter of the base. You place the path by placing a waypoint as you did when adding them for your start positions, only when making a path, you hold down your left-mouse button and drag out a section of path. When you release the button another point is placed and if you left-click again over the same spot, again holding the button down, you can drag out another section of this pathway. Label each path as I mentioned above.
Exactly where you put these paths as long as they start and end in the correct areas is up to you but a
simple two-point pathway is better than a long path going all around the map. Also note that where these paths are placed is where the AI will build their defenses so this should also be considered when placing pathways. Watch for pathway placement to avoid impassible terrain and bridges when at all possible. The path should be the most obvious route of travel.
**
SEE the reviewer guidelines section on base areas and pathways
here.
**
I think by setting up your map in this way you'll find AI players playing better and the map approval process more likely to happen.
Edited by user Wednesday, August 11, 2010 10:36:06 PM(UTC)
| Reason: Not specified