The following are some standard criteria we use when judging maps. Overall, we want quality maps and use our best judgment when writing reviews attempting to be as unbiased as possible. It should be understood the Maps don't need to have realistic landscaping but all maps need to be made well. These are the basic guidelines we use.
» Back To C&C Maps Staff Journal
Next: Files and Folders
Files and Folders
When we receive a map one of the first things we do is look at the map folder and the files it contains.
» Back To General Review Guidelines
Do the files and folder names match?
Sometimes an author will piece together their submitted map folder by taking their .map file and .tga file and making a new folder to contain them. Often, they will use a different name on the folder then the name of the map files. This is not the recommended way to create your map folder, here's how. Locate your map in the "Maps" folder, right-click on the folder and select "Send to/Compressed (Zipped) folder". This zip folder is what should be submitted. For more details click here.
Back
Does the folder contain a Readme file?
All maps should have a Readme txt file that contains the map name, author name and email, game type and map description. You can use Notepad or another text editor to make this file. This file should be placed inside the map folder. Here are the basic things that should be included in this file.
- Map Name: (This should be the same as your folder and map files.)
- Author Name: (We most often use nick names.)
- Author Email: (Should be your actual address so we can contact you.)
- Max. Players: (Not required but good to have.)
- Game: (C&C Generals or C&C Generals: Zero Hour.)
- Type of Map: (Mission, Multiplayer Only or Skirmish.)
- Description: (This should be the same as you'd like to see on our site.)
This file can also be used for explaining the storyline behind your map, map features, custom scripting or strategies of game play.
As you know, we all play many different games or versions of C&C and this Readme file would be a reminder to the player as to what game this map folder belongs to.
Note: We compare this file to that of the submitted information so be consistent with the names you use. The map and author name should match as well as your contact information and map description.
Back
Does the map have any map modification files?
We'll look to see if the map has been or is being modified with any other files. These can be but are not limited to the following.
- map.ini file.
With these files a mapper can change just about any aspect of the game, so we'll look at them closely. These files only work if the player has the map. Maps modified in this fashion are not recommended for multiplayer matches. If needed, we will ask the mapper to include a statement in their map description and explain that the map is modified and recommended for Skirmish play only.
- map.str file.
These files are used to display text in the game. Some common uses are military briefing strings, pop-up captions and text for timers and counters. We'll check this file for proper formatting.
- .wak file.
This file would add waves to your map along waypoint lines you've place along your shoreline. As this file is generated by "WAK Edit" we don't look through this file. We will be looking to see if your waves look as they should. Some common problems are waves that are going the wrong direction and waves not reaching the shore. Recommendations will be made if things don't look right.
- .tga image manipulation
At times we see a "TGA" image that has been modified from the standard image that is produced in World Builder. A mapper might add text or use a cropped image taken while in World Builder from a top-down view. Whatever the reason, we'll look to see that it still performs as it should when selecting the map and loading the game to play etc. Note: In most cases, we will not use a modified image for our web site. Only the standard image that is produced in World Builder, so keep that in mind.
Back
Next: General Setup
General Setup
After we've gone through the folder and files to see if the map has been modified in any way, we will then open the map with World Builder and check the general setup.
- Map Settings
We look at the map setting page to check that the "Name" textbox is blank. It's rare that we receive a map with a name listed here, but it has happened. If a name is added the map won't show in the "Unofficial Maps" section so this textbox should always be left blank for a custom map.
- Players List
We look see that the player list matches the game type and style. If it's a Skirmish map, we'll make sure Skirmish players are added and in the correct order. If any custom players are added, they should be listed after the Skirmish players. By checking the player list we also would know right away that the map was made with Generals or Zero Hour World Builder and if the map was submitted differently, we would check with the mapper for clarification. This has happened several times, so checking the player list is one of the first things we do.
- Map Size
We'll glance quickly at the map size to get an idea of the scale of things. The size of a map is determined more by the size of the base and CombatZone areas and other features added to the map. Maps however can be oversized for the number of players and if I had to give you a number, I'd say 600 would be the maximum size for a map intended for online use.
- Border Size - General
Borders are another thing that is all to often oversized. You don't need more than 10 - 20 in most cases. We've seen maps with a border of 300. That's 3000 feet and makes the square footage of the border larger than the active part of the map. Let's keep it more like 10 unless you need the extra room for a train turn around.
- A brief look at the scripts
For now, we'll just take a quick glace at the scripts to see if there are things we should be mindful of while looking at the map such as extra waypoints and pathways. We will look into any custom scripting in detail before we're done.
» Back To General Review Guidelines
Next: The Map Review
The Map Review
Now that we've done the preliminary check we'll get into the map itself.
» Back To General Review Guidelines
Map Boundary Line and Active Border
One of the first things we'll look at when checking out the map itself are the Map Boundary Line and Active Border. Unless the author has done some scripting to change the Active border, the Map Boundary Line and the Active Border should be at the same location. To check this do the following.
- Under View be sure the selection "Show Map Boundaries" is checked.
- Also check "Show Impassable Areas" or (Ctrl I) on your keyboard.
This will bring into view the Map Boundary Line represented by a blue band around your map. This Boundary Line is determined when you set the map size. We then compare the placement of the Orange Active border with the boundary line to see that they're the same.
To Adjust the Active border, using the Border Tool, Left-click and hold the mouse button to grab the Top-Right corner of the orange border and drag it out to match the blue band. If another border appears on the map, such a green or yellow, just drag this border to the lower left corner of the map to get rid of it. DO NOT remove the orange active border as it cannot be replaced. So FYI:
- The Blue band is the Map Boundary Line that is the total size of your map. Its size is set when you resize or make a new map.
- The Orange Active border is the playable area of the map. This border works up to the Map Boundary Line and thus it should not extend beyond this line. This is the default border that works automatically without scripting and is adjusted with the "Border" tool.
- By using scripts, any other colored border can be used as the new map border.
Back
Base Size
In general, we would normally like bases to be at least 1000 x 1000 feet. If you are working with Zero Hour's World Builder, you would find a Civilian/Structure object called "TempBuildingSize", which represents the minimum recommended innerperimeter size for an AI player to build their base.
If you using Generals, I'd suggest laying out a grid using waypoint lines as you can adjust each point to an exact location. Just remove them when you're done. For example: A map that's 300 x 300 would convert to 3000 feet wide. We'd suggest placing waypoint lines across your map at the 1000 and 2000-foot locations to measure things off.
Even for mission and multiplayer only maps, this is a good size but we are much more flexable when reviewing these types of maps.
We've seen maps with bases as small as 450 feet and others that are well over 2000 feet. In all cases we will make our best recommendations to get bases to a reasonable size.
Back
Map Areas
This section applies to Skirmish maps. These areas are referenced in the default skirmish scripts that load into the map at the start of the game. Because of this we like to see all areas placed with care to ensure these areas do not overlap one another and are within the map boundary line.
- SkirmishWorld (Optional)
Around the whole map we should see an area called "SkirmishWorld". (*Optional)
- InnerPerimeter
Each base should have an area that represents the buildable area of the base called the "InnerPerimeter#". As we mentioned above in "Base Areas", this area should be at least 1000 by 1000 feet. (# = Base Number)
- OuterPerimeter
Around the InnerPerimeter there should be another area called the "OuterPerimeter#". Again, the "#" represents the base number. This area triggers scripts that alert the player that an enemy is approaching. Because of this, we suggest that in places where there is an approach path leading into the base, this area be placed far enough away from the base to give the AI forces time to react to the invader before they breach the base's Inner Perimeter. In all other areas, the Outer Perimeter area can be placed tight around the Inner Perimeter.
- CombatZone
The CombatZone should be placed around all areas of the map outside the base areas.
Back
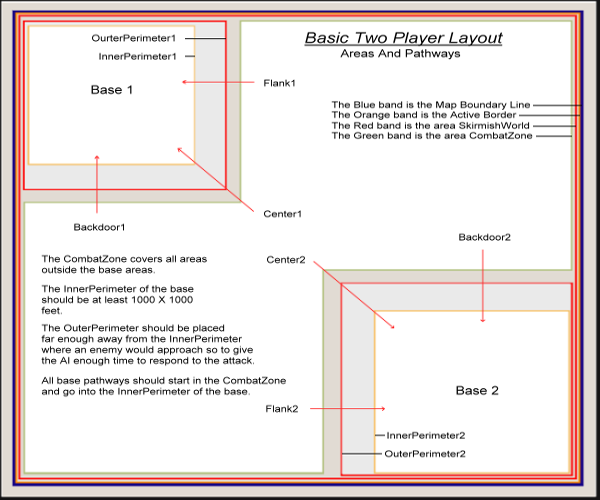
Base Waypoint Pathways
Waypoint paths tell the AI where to go to attack the enemy and where to build base structures. We check to make sure that waypoint pathways are placed going from the CombatZone into the inner perimeter of a base. These pathways also must be labeled correctly for AI to recognize the name and apply them to their scripting. Each pathway should be labeled with the textboxes called "Waypoint Path Labels:" using the names shown below.
The Preferred Names:
CenterX
FlankX
BackdoorX
Alternative Accepted Names:
CenterPathX
FlankX
BackdoorPathX
(X = Base Number)
Note that the names have First Caps and no space between the name and base number.
For Example:
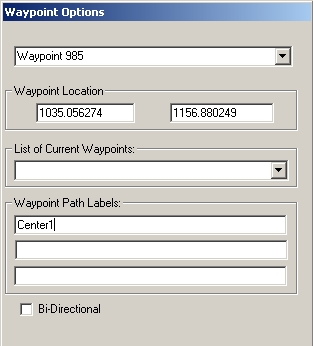
We will also check the following when looking at waypoint paths.
- We check that Pathways don't go through impassable terrain.
Pathways should be placed where units can travel.
- We check for Pathways starting on bridges.
We'll suggest that they be moved to solid ground.
- We look for Pathways that make unnecessary twists, turns or loops.
The most direct route works best.
Back
Elevations, Texturing and Details
Elevations and Texturing is a very subjective category based on how things look. We also take into consideration the skill of the author and how many maps we've received from this person. Along with making sure we have decent looking maps, we also want to encourage mappers to develop their skills. So if this is the first map we've received from this author and if there are no major flaws, we might let a somewhat boring map go through. We'll then make detailing suggestions on future maps from this author. Below are some examples on how we might base our decisions. This is not set in stone.
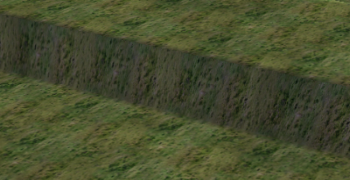
Sharp Cliffs
Sharp edged cliffs are fine, especially when going for a man-made look. We base our recommendations on what it looks like and how it's used. |
| If a cliff has a sharp edge and follows the X, Y angles, it would have clean lines. We might accept this. |
|
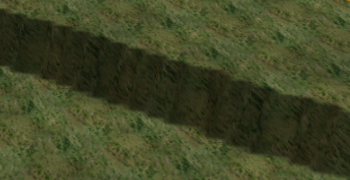
If a sharp cliff has a "Saw toothed" look to it, we would suggest that the cliff be feathered out. |
 |
|
 |
| The image below is lacking some detailing but it's an example of how a sharp edged elevation might be used. |
 |
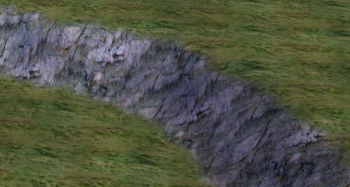
Getting a more natural look
It's generally looks better to give your cliff edge a higher elevation than the plateau behind it. |
 |
|
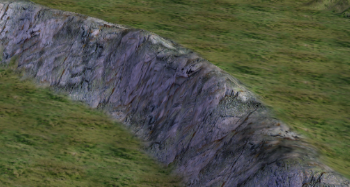 |
| By using your height tool to mound the area around the hill and varying your textures, you can give your cliff a more natural look. |
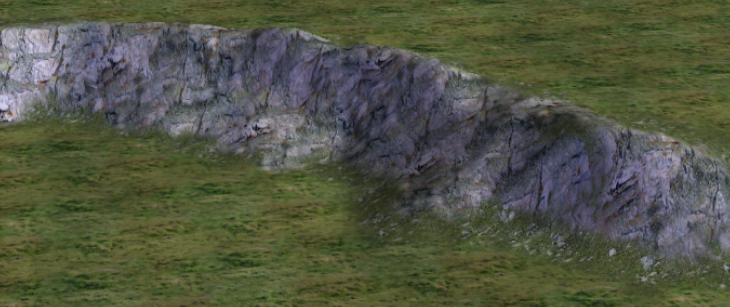 |
There are so many different texture combinations available. All I can say for sure is that we want something that is interesting, looks good and has all the rough elevations feathered out and textures blended. If it looks sloppy, we're going to let you know it.
Back
Final Comments
We do our best to look at all aspects of the map to ensure that things will work as expected. For example:
- Can you get to bunkers on top of the hill and will units load into it?
- Are all the bridges on the map working?
- Do scripts work as intended?
- Do AI players build their base?
I hope this guideline will help you create better maps and thus make the map approval process go smoother.
Back